FEED ME!


How to Feed Them?  Do I Fertigate (use the irrigation system for fertilization)?

To keep things simple, and to avoid rookie mistakes, like over-feeding, I decided not to use the irrigation system for fertilization in Year 1…but more to follow on this.

Yikes!  So Many Fertilizer Options…

So, do I go organic?  I could, but research indicated I would be making several applications over a growing season of several different organic fertilizers to get all the nutrients I needed, plus more to get the micronutrients, like magnesium, that the berries need to stay healthy…net, sounded like a lot of work, and remember, it is the LAZY S ranch.  See below if you still want to go with organic fertilizers.

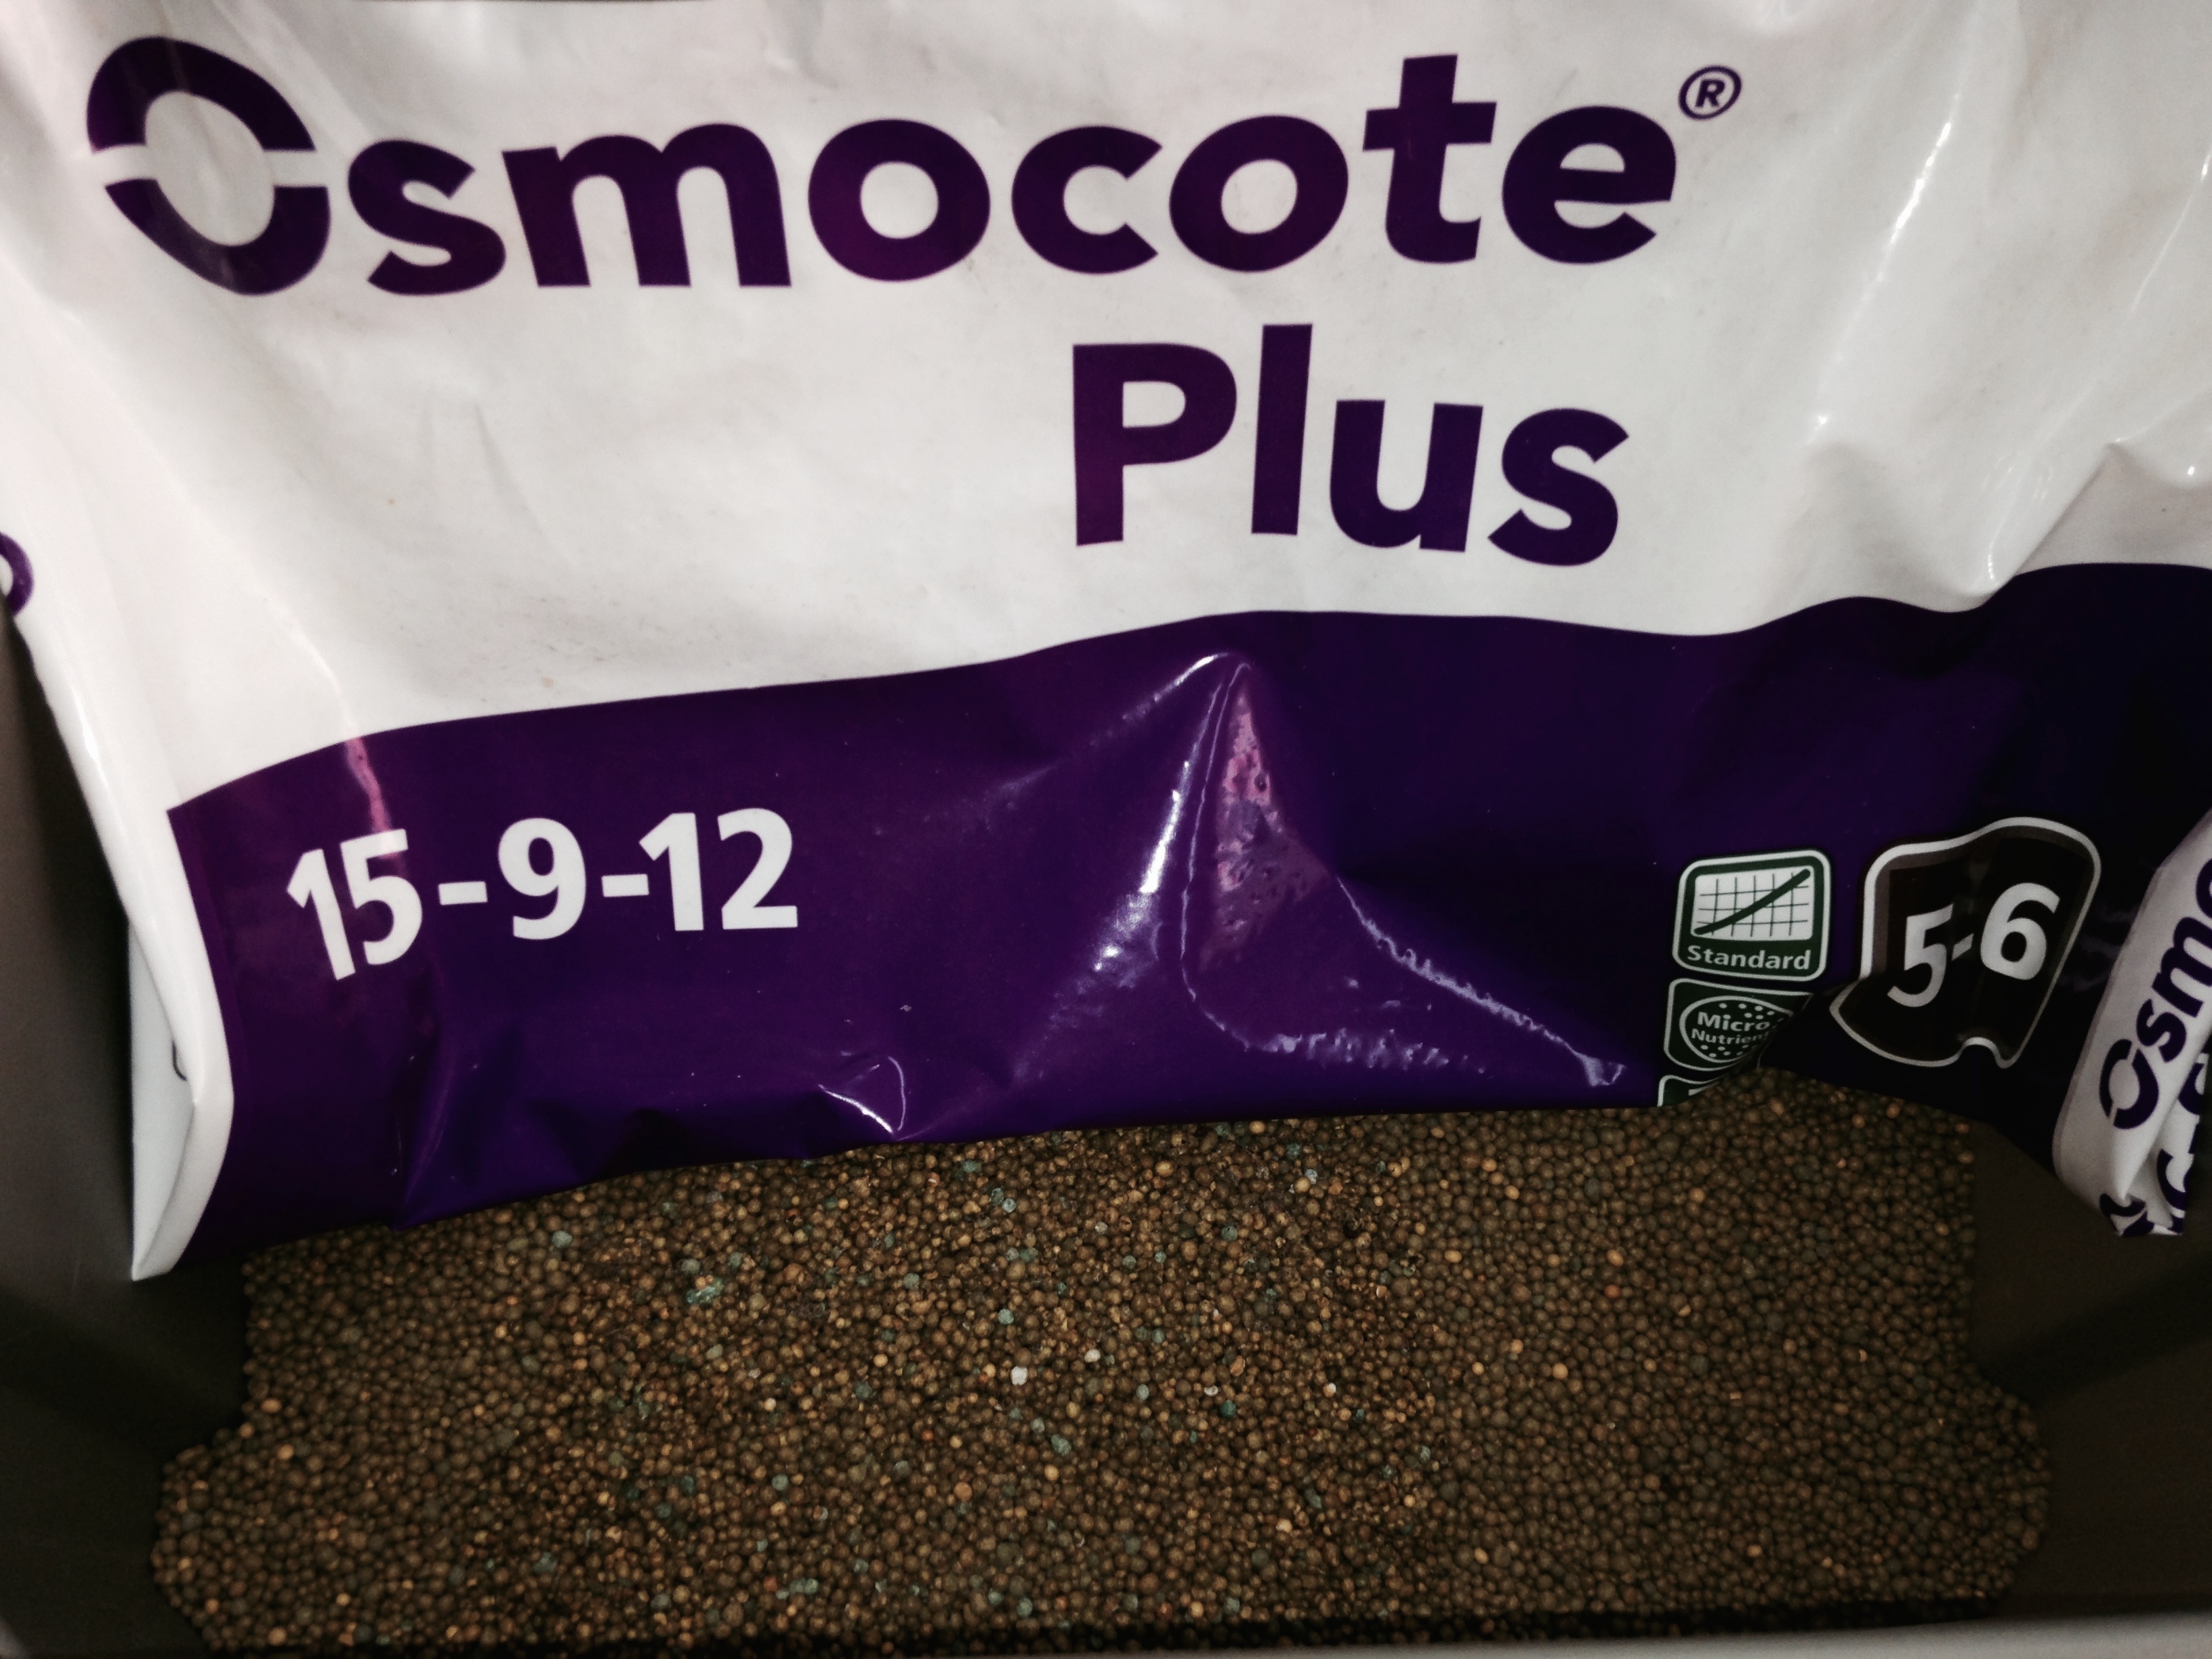
So, what else?  My latest soil report from the University of Michigan suggested using 1/2 lb of a typical balanced agricultural 12-12-12 NPK (N = 12% Nitrogen, P = 12% Phosphorus, K = 12% Potassium) fertilizer per 100 sq. ft.  But after reading a blog comment by the owner of Bluegrass Gardens in Murray, KY (www.bluegrassgardens.net) about his successful experience with blueberries using a controlled release fertilizer (Florikan 16-4-9) specifically blended for blueberries, I was hooked to try the latest fertilizer technology.  I had trouble locating a local source for the Florikan, so I contacted my local Everris (Peters, Osmocote) representative (Don.Furterer@everris.us.com), and he suggested a similar Osmocote product.  I went with Osmocote Plus 15-9-12 + micronutrients.  This product controls the release of the nutrients over 5-6 months (at 70F) based on moisture levels and temperature…so when it’s warmer and plants are growing more actively, the fertilizer allows more nutrients to be released.  This sounded like a smart and low maintenance approach.  My cost was $2.24/lb for a 50lb bag from BFG Supply in Kalamazoo, MI.

IMG_2131

There were few organic options that provided a blend of the essentials (NPK) for one application.  For those who may want to go organic, my research found that for Nitrogen, some form of urea is advised or Ammonium Sulfate and/or with Diammonium phosphate blends.  Ammonium Sulfate will also lower soil pH, so if the soil pH is on the high side of the target 4-5 pH range, this is a good option.  This may take the pH too low if you are already at or below target.  Other organic options for Nitrogen found were cottonseed meal or blood meal (12/1.5/.6), but these typically last only 6-8 weeks.  Ammonium Nitrate and other Nitrate containing fertilizers should be avoided because the Nitrate ions will damage the plants.  It is also reported that Aluminum Sulfate should not be used, as Aluminum is a plant growth toxin and Aluminum becomes more available at low pH.

For Phosphorous, research suggested the use of rock phosphate (note this is hard to get into the root zone after planting, so it should be incorporated into the top 6-8 inches of soil at planting).  For Potassium, greensand (potassium silicate) can be used as an organic option.

Several sources also recommended a spring application of Ammonium Sulfate as follows  in addition to the controlled release balanced fertilizer: Year 1 = 1 oz/plant, Year = 2 oz,  Year 3 = 3 oz, and Year 4 = 4 oz.

IMG_2128

How Much to Apply?

Several charts are available on-line describing the amount of Nitrogen needed by blueberries per year based on plant size and/or age.  However, I did find a correlation between plant size and the amount of a controlled release fertilizer (18-6-12) to apply for growers of container plants, specifically:
For 1 quart size plants = .625 oz (18gm), 1/2 gallon = 1.25 oz (35gm), and for 1 gallon = 2.5 oz (70gm)

 When to Feed Them?

It was suggested that no fertilizer be applied until the following growing season if plants are installed in the fall to prevent forcing new growth before the arrival of cold weather, so the first application of balanced fertilizer was done at the Lazy S in April 2014.  I applied the Ammonium Sulfate (mixed with water to speed incorporation) in May 2014.  Note 1 oz of Ammonium Sulfate is approximately 2 Tbsp.

So, Do They Look Well Fed?

IMG_2144 IMG_2145 IMG_2146

These pictures were taken in July 2014, so after about 4 months of feeding.  The Auroras and BlueRays at this point are 3 year plants, and the BlueCrops are about 2 yrs old.

But, I am having issues with chlorosis in some plants…ugh!  More to follow in a future blog.


The Wet Stuff – And The Irrigation Math

The Lazy S Ranch consists of 100 plants in four 100 ft rows…too many to water by hand…so some automation was needed.  We didn’t pick the name of the Ranch out of the blue air (ugh!).  SW Ohio is always prone to late frosts, so I also knew I wanted to include some type of frost protection.  Finally, municipal water was going to be used for irrigation, and tests on the city water revealed a pH in the 8-9 range.  After having spent so much time increasing the acidity of the soil, I did not want to irrigate with alkaline water…so I knew I needed some way of adjusting the pH of the irrigation water too.

Lazy S Irrigation System with Injector and Controller

So, how do you decide what irrigation system you need?  The Lazy S Answer:  Ask a local grower.  The Lazy S took a field trip to Rouster’s Apple House (despite the name, Rouster’s only grows apples for cider now.  Their big crop is acres and acres of blueberries for a u-pick-them commercial operation in SW Ohio).  I’ve been picking here for years, and Dan & Donna were more than happy to discuss all things blueberry, including irrigation.  Rousters uses drip line irrigation with a fertilizer injection system, but they have lake water available, so their irrigation water’s pH is more neutral to acidic.  Dan suggested I contact his irrigation vendor, Trickl EEZ (info@trickl-eez.com) for a consultation about system design, cost, installation, etc.

First, how do you know how much water you’ll need?  I knew the maximum flowrate would be needed by the frost nozzles, but I also needed to know how much water the blueberries would need so I could size and design the drip lines.  From several resources on the web, the consensus was the berry plants would need 1 acre-inch of water per week.

But what is an acre-inch and how long would it take to apply it?  It is the equivalent of 1 inch of water spread evenly over 1 acre, or doing the math, about 27K gallons…so how much would the roughly 1/4 acre Lazy S Ranch need?  How big would the drip lines need to be to apply that much water? How long would the irrigation need to be on to provide the acre-inch?  Not to worry, since the Trickl EEZ Catalog has a handy calculation to help:

Irrigation hours needed to apply 1 acre-inch per week = (.052)(ft between rows)(emitter spacing in inches) / (flow rate of each emitter in gph)

So, what specific components were selected?  The Trickl EEZ representative for my area, Tom Anderson (517-403-1738) and I discussed selection of frost control sprinkler heads (Nelson R-33 Frost Control Impact Sprinkler), drip line (Netafim UniRam Pressure Compensating Dripperline with .42gph per emitter and spaced every 24 inches) and an acid/fertilizer injector (Dema MixRite 569 PVDF with .1-.9% induction ratio).

IMG_2181

Frost Head mounted on 6ft post

IMG_2182

Nelson R-33 Frost Head with 46′ throw radius with 60psi water pressure


Note emitters in drip line spaced every 2ft

Note emitters in drip line spaced every 2ft

Example installation of drip lines along rows

Example installation of drip lines along rows


Why these components?  The frost control head was sized to allow two nozzles to cover the site (spray all the plants).  For the drip line, Netafim got good reviews for resisting clogging (the emitter or drippers in the hose can become clogged with dirt/debris).  Although the plants are spaced 3 ft apart, Tom indicated the drippers would still irrigate the plants in the row properly, i.e., it was not necessary to space/place the emitters to coincide with each plant.

So here are the initial results for the Lazy S:

Max Flow Rate (for the 2 frost heads) = 9 gpm

Flow Rate for 2 rows with 2 drip lines per row = 1.4 gpm  (NOTE: Rows 1&2 and Rows 3&4 are designed to be different irrigation zones)

Irrigation hours needed per week for 1 acre-inch = 15 hrs

What is an injector and how did you select it?  The injector selection was more complicated.  An injector is essentially a pump used to add one fluid to another in a precise ratio.  I knew I at least wanted to acidify the municipal water I was going to use for irrigation…and maybe later inject a fertilizer solution into the irrigation water.  But first, I wanted to lower the water pH from 8-9 as tested from the source down to a pH of 4.5 to 5.  After reading the pros/cons of several acids (acetic, hydrochloric, sulfuric, citric, etc.) available to use for lowering the pH, I selected sulfuric acid (available commercially as battery acid in a concentration of about 35%).  Next, I titrated (slowly added) the acid into the city water to determine how much battery acid would reduce the pH of the municipal water.  Results indicated I needed 1 part acid to 500 parts water, or a .2% injection ratio.  The injector needed to be capable of this injection ratio, and be constucted of materials compatible with the battery acid.

DEMA Injector Model 569 PVDF

DEMA Injector Model 569 PVDF


Blueberry Soil Chemistry 101: Soil Pre-Work at the Lazy S

IMG_2145

Mr Ray – a 2 yr old BlueRay variety planted Sept 2013


Hey Ray: What Keeps You Looking So Good?

  • I always test my soil before I get planted.  If you really want to know about the soil you’re planning to put me in, I suggest a soil test. Soil chemistry is really important to me.  For example, most plants like their soil acidity, as measured by pH, in the 6-7 range, but I like it more spicy, say 4.5 – 5.5 (more on pH later).  Michigan State University Extension (www.msusoiltest.com) can test the soil for $25 and recommend ammendments, specifically for blueberries, based on the results.  They will test for pH and additional results like Cation Exchange Capacity (CEC).  CEC is a measure of my soil’s ability to retain and supply nutrients to me, and generally the higher the better.  For example, pure humus has a CEC of 100.  CEC will also tell you what type of soil you have…from sandy loam (CEC = 6-8) to silt loam (8-15) to clay loam (15-20) and clay (CEC over 20).  Knowing the soil type is important in determing how much sulfur you may have to use adjust my soil’s pH if needed.

The Lazy S Ranch soil’s original test results using a composite sample from all rows in Fall 2012 and before any soil amendments were a pH of 6.1, CEC = 12.1, Calcium @ 1265 ppm (a measure of clay content), and 3.1% organic matter.  Based on these results, MSU recommended as follows:  “This soil is not suitable for growing blueberreis because of the high clay content.  Choose another berry type or bring in the correct soil for blueberrries (pH less than 6 and sandy texture).” 

by Jon Dahl, MSU Soil Testing Specialist

  • I like organic matter.  I really don’t like clay.  First, clay soils tend not to drain well, and I don’t like my roots in standing water.  Clay soils also make it tougher and more expensive to get me the soil chemistry I need. (see pH disussion below).

In order to improve the soil as prescribed, The Lazy S Ranch is trying two different soil types to determine a best practice.  The soil composition in Rows 1&2 is 1/3 by volume each native soil, pine fines, and peat moss.  Rows 3&4 are 50% by volume each pine fines and peat moss without any native soil.

Amended Native Soil - Rows 1 + 2

Rows 1&2 – Amended Native Soil

Pine Fine + Peat - Rows 3 & 4

Rows 3&4 – Pine Fines + Peat Moss only

  •   My soil  pH (measure of acidity, where 7 is neutral) should be in the 4-5 range for me to get the food that I need.  This pH allows me to get the nutrients, like iron, magnesium, etc. from the soil that I need to stay healthy.  Also, if you need to make a pH adjustment to the soil for me, most resources I read indicate that clay soils will require approximately 4 times more sulfur to increase acidity (lower pH) by 1.5 to 2 points than a sandy soil does.  Several sources are available to determine how much sulfur to use to increase acidity (drop pH) by a desired amount (See Table 2 at http://www.ces.ncsu.edu/wp-content/uploads/2013/03/Lowering-Soil-Ph.pdf or Table 1 from http://blueberries.msu.edu/uploads/files/Lowering_Soil_pH_with_Sulfur.pdf).  It takes the action of microbes (Thiobacillus thiooxidans) in the soil to metabolize (oxidize) the sulfur to lower the pH, and so more sulfur may also mean more time to get the soil the way I like it.  Sources indicate 2-6months for the microbes to work, and they only are active in the warmer months (soil temps above 55F).  In fact, MSU recommends the soil pH adjustments should start a year before you try to plant.

At the Lazy S, sulfur was applied in Fall 2012 to the rows containing native soil (Rows 1&2) assuming the amended soil was still pH = 6 (thought to be worst case).  From Table 2 above, 3.75 lbs elemental sulfur per 100 sq ft are required to reduce pH from 6 to 5 in a high clay content soil type.  Since the rows are about 2 ft wide, this amount was doubled, and 7-8lbs of sulfur were incorporated into the top 6-8 inches of the soil.  From Table 1, 1540 lbs/acre are required to drop from a pH of 6 to 4.5, and based on the 200 sq ft rows, this nets 7 lbs/row if you do the math.

Sourced locally in 4lb bag since only required 4 bags

Sourced locally in 4lb bag since only required 4 bags

FAST FORWARD ABOUT A YEAR – IT WORKED!

The Lazy S Ranch soil test results from Rows 1&2 in the Fall 2013 a pH of 5.0, CEC = 15.2 (higher probably due to the increased organic matter), Calcium @ 942 ppm, and 23.6% organic matter. Based on these results, MSU recommended as follows: “No pH adjustment necessary.  Apply 1/2lb 12-12-12 fertilizer per 100 sqft in the Spring.”

by Jon Dahl, MSU Soil Testing Specialist

No Blueberry Likes To Stand in Water – The Drainage System

Blueberries like it evenly moist, but without wet feet!

So although the Lazy S site seemed to have good drainage (no standing water even after heavy rainfall), since automated irrigation was planned, drain lines are also installed beneath each row to provide protection against waterlogging the plants in the event of overwatering.

Just the tool for trench making!

Just the tool for trench making!

4 - Ditch Preparation

Finished trench

2 - Gravel Delivery

Supplies are delivered

3 - Drainage Supplies

Fabric shield used as shroud to try to prevent sediment from fouling the gravel and drain lines

5 - Getting Started

Sediment shield laid in trench first with layer of gravel…

6 - Laying the Drain

Next standard slotted (perforated) drain line is placed in the trench…the drain line also came with its own sediment “sock”

8 - Covering the Drain Line 1

Final layer of gravel placed over drain, and overlapped with the remaining sediment fabric

12 - Landscape Cloth Covering

Finished drainage system ready for soil

11 - End of Line

Lowest end of drain line for each row in gravel bed showing sediment sock tied off

7 - Preparing Drain Line 9 - Joining Drain Line 10 - Completing a Splice

Ranch Design & Installation Begins Fall 2012

Every Good Blueberry Needs Space

Most recommendations for blueberries are 3 – 4ft spacing between plants, 8-10ft between rows and use raised beds/rows to improve drainage

The Lazy S is designed for 100 plants, 3 ft spacing between plants, in 4 raised rows spaced 10 ft apart with 25 plants per row

Keeping things straight...

Trying to keep things straight…

Row till prep with Roundup

Row till prep with some Roundup (herbicide) to minimize weeds later…

Light tilling to outline rows

Light tilling to outline the rows

Rows are outlined and ready for drainage installation

Rows are outlined and ready for drainage installation